Industrial Pump Repair Canada - Pump and Seal Repair and Replacement Services
ISO 9001 Certified

Industrial Pump Repair Canada - Pump and Seal Repair and Replacement Services
ISO 9001 Certified
Repairing a mechanical seal demands more than replacing a worn rubber ring. The seal controls leakage between rotating shafts and stationary housings in pumps, mixers, and compressors. A small scratch on the polished face can release fluid within minutes. This guide explains mechanical seal repair through practical inspection, careful measurement, and controlled reassembly. It is written for maintenance professionals, trained technicians, and readers learning from established engineering practice. Safety comes first. Isolate equipment, release pressure, drain hazardous fluids, and follow the manufacturer’s service instructions. Never trust a silent pump.
A reliable repair begins with evidence. Record the seal model, shaft size, operating temperature, pressure, speed, and fluid type. Remove the assembly without forcing carbon faces or bending springs. Wash components with a compatible solvent, then inspect faces under bright, angled light. Look for chips, heat marks, grooves, corrosion, and uneven wear. Check the shaft sleeve for fretting and measure runout with a dial indicator. Replace damaged faces, secondary elastomers, springs, or gaskets when specifications require it. Some seals should not be repaired. That judgment matters.
During reassembly, keep faces clean and handle them by their edges. Lubricate elastomers only with an approved product; the wrong lubricant can swell them. Align the rotating parts, confirm spring compression, and tighten fasteners evenly. A pressure test and monitored startup can reveal trouble early. Watch for drips, vibration, temperature rise, and unusual noise. Even experienced technicians miss simple alignment errors. Therefore, document every measurement and result. When the design is unfamiliar, consult the OEM or a qualified seal specialist. Good mechanical seal repair is careful, traceable, and honest about its limits.
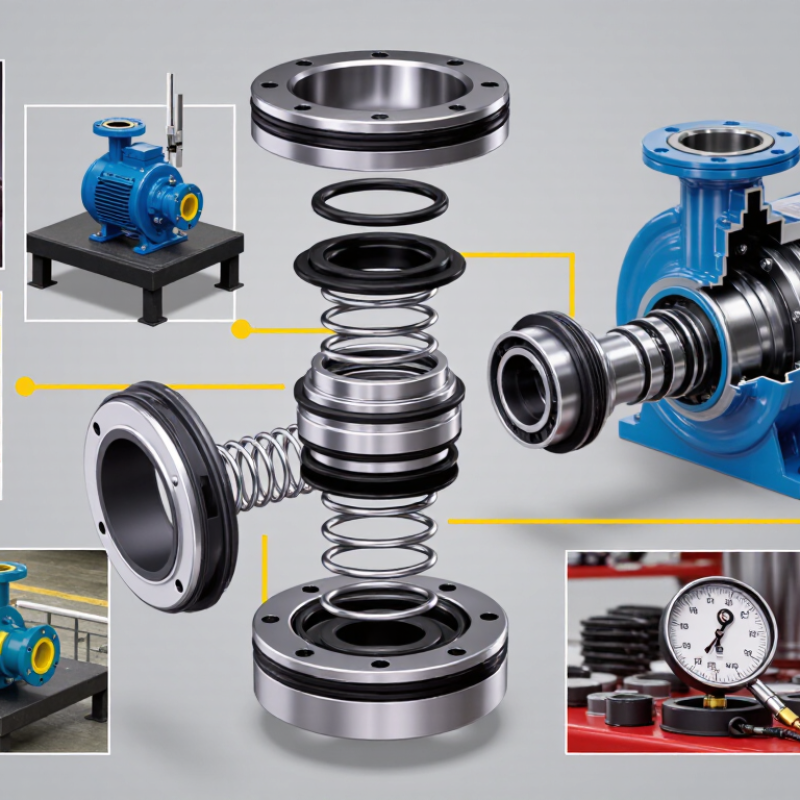
Mechanical seal repair begins with failure identification, not immediate disassembly. Leakage may indicate worn faces, damaged elastomers, shaft movement, or poor alignment. Check the leak pattern, fluid temperature, vibration, and operating history. A thin, steady drip differs from sudden spraying. So does overheating.
Safety comes before inspection. Isolate electrical and process energy, lock the equipment, and verify zero pressure. Drain trapped liquid into a suitable container. Wear eye protection, gloves, and protective clothing suited to the fluid. Never trust a closed valve alone. Confirm the pump cannot start unexpectedly.
Remove the guard and coupling only after isolation is confirmed. Photograph the assembly before removing components. Inspect seal faces for scoring, chips, blistering, or a dull dry-running mark. Check the shaft sleeve for grooves and measure shaft runout with a dial indicator. Examine springs, O-rings, and deposits carefully. A failed seal may be a symptom, not the cause. Misalignment, cavitation, blocked flush lines, and excessive vibration can destroy a new seal quickly.
Clean parts with a compatible solvent and lint-free materials. Do not touch polished faces with bare fingers. Replace damaged components, following the approved service dimensions and torque values. Lubricate elastomers only with a compatible medium. Install the seal squarely, then rotate the shaft by hand. It should move smoothly. I have seen careful repairs fail because a flush connection remained blocked. That small oversight deserves a final check. Test gradually, monitor leakage, temperature, and vibration, and stop immediately if conditions worsen.
How to Repair a Mechanical Seal?
Disassembling a mechanical seal begins with safety, not tools. Isolate the equipment, lock out the power, release pressure, and drain the process fluid. Wear protection suited to the fluid and keep a clean tray nearby. I usually photograph the assembly before removal. That simple record prevents confusion later.
Remove the seal carefully, following the equipment service procedure. Do not pry against delicate sealing faces. Mark the orientation of springs, collars, and stationary parts. Place each component on lint-free material. Dirt is a small enemy. Even one metal chip can create a leakage path.
Inspect the rotating and stationary faces under bright, angled light. Look for grooves, chips, heat discoloration, or uneven wear. A polished face should remain flat and smooth. Check elastomers for swelling, cuts, brittleness, or flattened sections. Examine springs for corrosion and loss of tension. Inspect the shaft sleeve for scoring, rust, and wear near the seal location. Measure shaft runout when leakage seems unusual; misalignment may be the real problem.
I once focused on a damaged face and overlooked a rough sleeve. The replacement seal failed early. That mistake changed my inspection routine. Compare measurements with the equipment manual, and replace parts that exceed approved limits. Never force a questionable component back into service. A clean inspection often reveals that the seal was only the symptom.
How to Repair a Mechanical Seal?
Clean, Replace, or Restore Damaged Seal Parts
Repairing a mechanical seal starts with safe isolation. Stop the pump, release pressure, and drain the fluid completely. Wear suitable gloves and eye protection. A small trapped pocket can still cause injury.
Remove the seal without forcing the shaft or housing. Clean each part with a compatible solvent and a lint-free cloth. Inspect the seal faces under bright light. Look for grooves, chips, heat marks, or uneven wear. Check the spring, retainer, O-rings, sleeve, and stationary seat. Measure shaft runout and seal-chamber dimensions when possible. Do not trust appearance alone.
Clean it carefully.
A lightly dirty metal component may be reusable after cleaning and inspection. Replace cracked ceramic, chipped carbon, hardened elastomers, damaged springs, and deeply scored sleeves. Seal faces with minor deposits can sometimes be restored by controlled lapping, but this requires a flat plate and accurate technique. Hand sanding often creates an invisible taper. That mistake may cause leakage within hours. I have also seen clean-looking faces fail because the wrong O-ring material softened in service. Confirm chemical compatibility, temperature limits, and installation dimensions from reliable technical data. Lubricate elastomers only with an approved compatible film, then install the seal squarely. Rotate the shaft by hand before startup and check for rubbing. A brief leak check matters more than confidence.
A mechanical seal often fails during reassembly, not during operation. Correct alignment matters more than force. The U.S. Department of Energy reports that pumping systems may consume 25–50% of industrial facility electricity. Small leakage and friction losses therefore deserve careful attention.
Before installation, clean the shaft, sleeve, gland, and seal faces with lint-free wipes. Check the shaft for burrs and measure runout with a dial indicator. API 682 recommends controlled installation practices because face loading, vibration, and misalignment can shorten seal life. Align the shaft vertically when possible. Keep the stationary face square to the housing. Tighten gland bolts evenly, using a cross pattern and the specified torque. Uneven tightening can tilt the seal and create a narrow leak path.
I have seen technicians push the rotating face too quickly. That mistake can damage an elastomer before startup. A thin film of clean process-compatible lubricant helps movement, but excessive lubricant attracts particles. Confirm spring orientation, setting dimension, and collar position against the assembly drawing. Rotate the shaft by hand afterward. It should turn smoothly, without scraping or sudden resistance. I still recheck the setting dimension twice; rushing this step has caused avoidable repairs in my experience. The Hydraulic Institute also emphasizes eliminating piping strain and excessive vibration, since both can disturb alignment after installation. Fresh components are not enough. Precise assembly is what makes them reliable.
Testing a repaired mechanical seal begins before installation. Clean every face with lint-free material. Inspect carbon, ceramic, springs, and elastomers under bright light. A tiny radial scratch can become a visible leak after heating. Measure face flatness, spring compression, and shaft runout against the equipment specification. My practical mistake was trusting appearance alone. Polished faces can still be uneven.
After assembly, perform a controlled pressure hold using the approved test medium and limit. Never exceed the seal or equipment rating. Watch the chamber, shaft, and drain area for pressure loss or visible leakage.
Then run the pump at low speed, if permitted, while recording temperature, vibration, pressure, and leakage. Check again after thermal stabilization. API 682 emphasizes controlled qualification and leakage monitoring for centrifugal pump seals, although field repairs need site-specific acceptance limits.
Prevention deserves equal attention. The U.S. Department of Energy reports that pumping systems can consume about 25% of industrial electricity. Poor alignment, dry running, and blocked flush lines can turn a small seal defect into costly energy waste. Install clean flush fluid, verify correct rotation, and protect the seal during coupling alignment.
Trend vibration and leakage readings weekly. A simple log often reveals gradual deterioration earlier than an emergency inspection. Do not rely on one successful test. Operating conditions change, and maintenance assumptions can be wrong.